The Backgammon Blitz
The Backgammon Blitz
I believe the best way to understand how to do a proper blitz in backgammon is to start with the dictionary. The dictionary defines the word blitz as follows:
An overwhelming all-out attack.
The idea of the blitz is to barrage your opponent by hitting him and making points and hopefully, if you are successful, closing him out completely so that he has one or more checkers on the bar while you proceed to win a gammon or backgammon.
Of course the word blitz is actually short for blitzkrieg which was the massive German offensive at the start of World War II. The Germans conquered whole nations in days and sometimes hours because of two things:
- They had a large, strong army in place.
- They attacked quickly and relentlessly until they achieved their goal.
The backgammon blitz works in exactly the same way. And when it is successful, the success is complete … ending in total rewards that often include gammons and sometimes even backgammons.
Many say the Germans lost the war because they eventually spread their resources too thin by fighting on two fronts. And that same error will cause the backgammon blitz to fail.
So what we have learned so far from the Germans is that if we want to have a successful blitz, we must have a lot of ammunition in place; we must be unrelenting; and we must focus our resources on one area of geography—our inner board.
Now, let’s put these principles to work over the board and discuss how and when you blitz and don’t blitz.
For the sake of simplicity, let’s assume on every position it is a money game and your opponent has the cube.
Let’s take a look at Position 1, Black on roll, and Black to play 5-3.
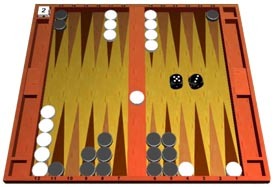
Yes, you could make your 3 point and not hit anything and not leave a direct shot, but if you do that and White rolls a 1 or a 4, or a double 2, or a 2-3, he not only has an anchor that will probably prevent him from getting gammoned, he wins a fair share of games with that anchor. If you count the rolls, that 23 out of 36 rolls that really work well for him.This is an ideal blitz position. Like the Germans, Black has a tremendous army (many checkers and builders) in place to attack the inner board. White has few defenses with a checker on the bar and two blots. Here is a classic opportunity for Black to execute a blitz. A perfect blitz is one that keeps the opponent from anchoring (making a point) until you end up closing your board with the opponent’s checker(s) on the bar. The best way to keep White from making a point here is to put all his checkers on the bar … so the only way he can make a point is by rolling doubles. In this case, only double 1, 2, 3, and 4 work. So clearly the play here is to move 9/4*/1*.
The down side to the double hit is that you might get hit back with a 1, but even if you do, White’s board allows for easy re-entry, and you still have plenty of soldiers to attack with.
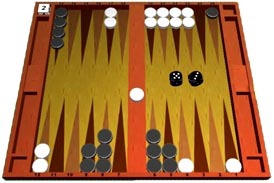
Now, take a look at Position 2, and how would you play 5-3?

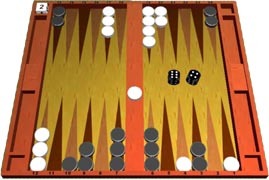
Now, take a look at position 3. How do you play 5-3?In this position, it is still right to attack, but it is much better not to hit two. In this situation, your goal is to make the better point … the four point. When you are blitzing, you don’t care about what order you makes the points in … you just want to keep him from anchoring. This is not a blitz position simply because you don’t have enough checkers in position to close the board before White is likely to anchor.
Here you have plenty of ammunition … just as much as in Position 1, but the big difference is that if you get hit back you could be in big trouble, as White has an excellent board. So in this position, you do not go on an all-out attack (blitz) but play a more positional game, making points and safetying checkers and waiting for the right opportunity to strike, or simply win a race.
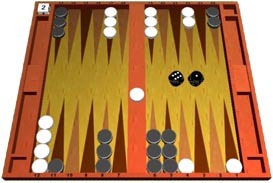
Take a look at Position 4. Black has a 6-4 to play. What’s your play?
Many people make the mistake in positions like this of not hitting. They worry about getting their checkers out of White’s inner board. When they do this, they are fighting the war on two fronts, and we already know what happens when you do this. The right play is to hit with the 6 and bring another checker (ammunition) down from the 13 point. When you are blitzing, focus on one side of the table.
Clearly there will come a time when it is important to start moving those back checkers, but it’s a lot easier to get out and around the board when your opponent is in jail (on the bar).
Let’s take a look at one more position. In position 5 you have a 6-1 to play. What’s your play?
It all sounds so simple doesn’t it. There really is no great art to blitzing … keep attacking and keep bringing more checkers into play. I am sorry to say that in “real life” it’s not always so clear. Sometimes you have “almost” enough ammunition. Sometimes your opponent’s board is “pretty good” and getting hit could be risky. In match play, the position of the cube and the score, and gammon risks and win advantages both ways have to be taken into consideration. Some times when you are blitzing you get a roll where you really do need to pay some attention to your checkers on the other side of the board so as not to get trapped and have to break the board on your side.Well, by now I hope you’ve learned the lesson. The right play here is not only to hit, but bring a checker down to the open spot on your bar point so you have another builder to do more hitting and covering. So hit with the 1 and bring a 6 down.
So like just about everything else in this wonderful game, we do have a “general” strategy, and a basic rule of thumb, a standard way of playing, and it is often the way to play. But only experience and study will help you understand when to blitz and when not to blitz and how to blitz when you do. I hope this article will give you some insights that will help.
by Phil Simborg, 2008
Leave a Reply