The European Split
The question of what to do with a lone back checker can be very tricky. Ideally you would like to get it out and safely home. But is it worth moving the checker up partway in the opponent’s home board, subjecting it to attack? That can be a difficult problem.
Several years ago European players were much more prone to make this sort of play than American players. For this reason American writers dubbed it the European split. It is different from the normal split when there are two back checkers. There the other back checker guards the lead checker if it is hit, and threatens to make an advanced anchor if the checker is not hit.
When there is a single back checker, moving up in the opponent’s board is a tricky proposition. The checker is on its own. If it is attacked, there is nothing to defend it. The American players would tend to leave the checker back out of harms way and work on the offense, while the Europeans tended to try to rush the checker home.
The proper choice is a function of several things. The race is a factor of course. The structure of the enemy board matters. You are more apt to want to escape when facing a prime than when facing a bunch of builders and inner board points.
Of course how the roll plays otherwise is a factor also. We will try to examine positions where the play of the roll on the offensive side of the board isn’t too critical, so the key decision is whether or not to make the European split.
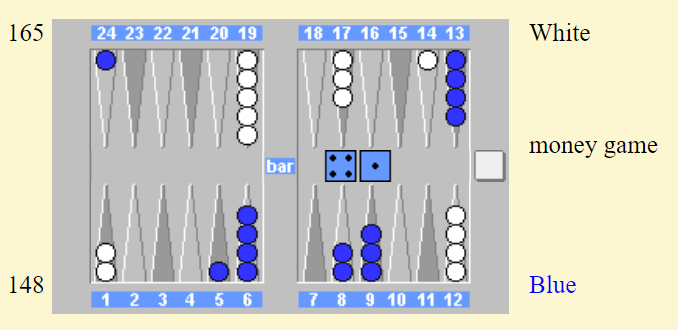
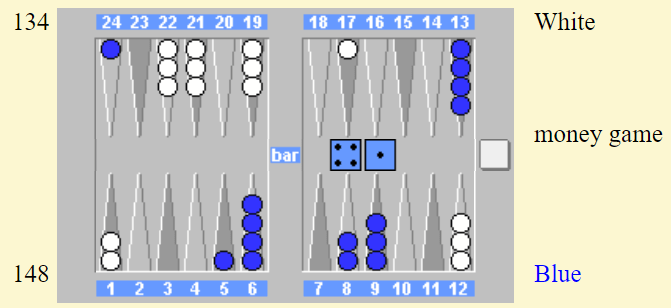
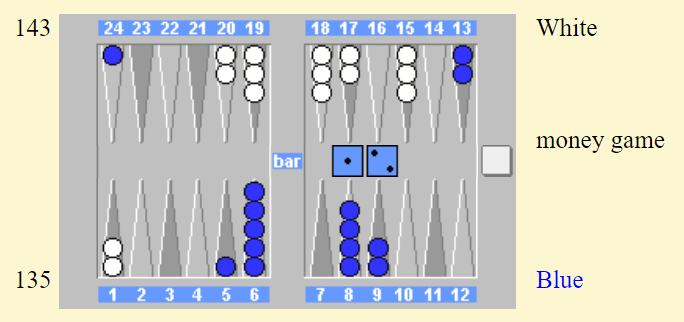
Blue will cover with the ace, of course, so must choose between 24/20, 6/5 and 13/9, 6/5. Moving the builder down from the midpoint is a probably a slight improvement in the offense, but it isn’t a major factor. The question is whether or not to advance the back checker. Blue is ahead in the race, which argues for coming up. On the other hand, the back checker isn’t in great danger of being hemmed in where it is. White would love to make his five point, particularly if he could make it on Blue’s head. White would not hesitate to hit loose on the five point, and since Blue has no other back checkers he would only hit back with a five. For these reasons, it is preferable to play avoid the European split and play 13/9, 6/5.
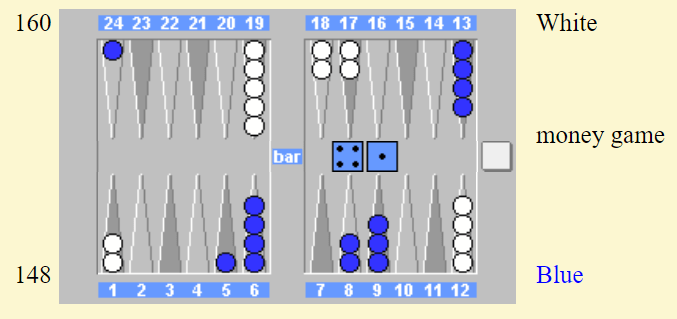
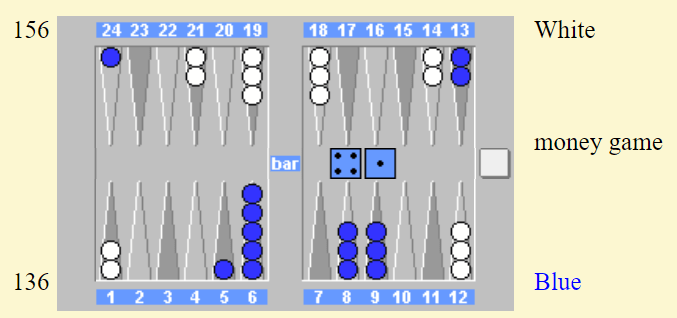
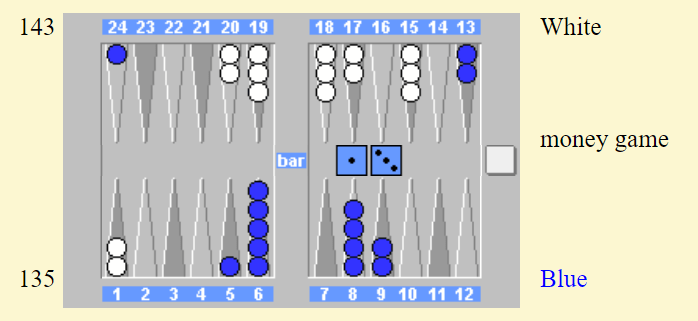
This time Blue is facing a different structure. White has made his bar point, and is working on building a prime. Now it is correct to split up with 24/20, 6/5. The danger of being attacked on the five point is still there, but in order to do so White may have to break at least one of his valuable points. That was different from the previous position where White was poised to attack. Also, Blue is in some danger of getting himself hemmed in. As long as White’s bar point is open Blue is one roll from getting out safely, but once the bar point closes Blue has to get off the 24 point in order to escape. Now is the time to do so while White has no board. Later may be too dangerous.
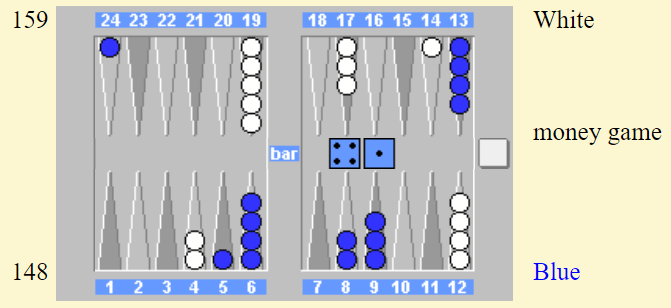
Same position as the first one, but now White’s anchor is advanced. This is sufficient to make moving up correct. When White’s two back checkers were back on Blue’s ace point, Blue didn’t need to escape in order to win. If Blue could build a prime, he would have the edge in the priming battle, and eventually White would be forced to crunch. With White having the advanced anchor, it is another story. Blue isn’t priming anybody. If White succeeds in trapping Blue’s back checker, it is White who will win the priming battle. Escaping has a higher priority than it did before, so 24/20, 6/5 is correct.
As the opponent’s inner board strengthens, the more important it is to keep that back checker out of harms way and just work on the offense. The big danger is getting blitzed, and moving up is an invitation to be attcked. Here it is very clear to stay back and play 13/9, 6/5.
The above position may seem to contradict the previous theme, since here the correct play is 24/20, 6/5. This is true even though Blue is a bit behind in the race. The reason is simply that being on the 20 point is safer then being on the 24 point, because White has fewer builders trained there. Blue would like to escape, but that is not the main reason for moving up. Blue is simply trying to stay off the bar so he can improve his offense. White has the stronger board, so White’s game plan is to attack. Blue wants to avoid this. If one of White’s builders on the three or four point were farther back, then advancing the back checker would be wrong.

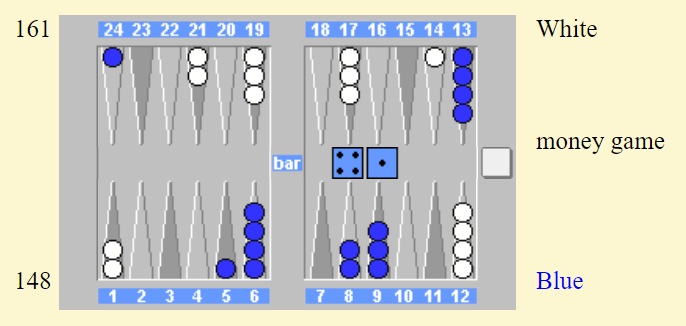
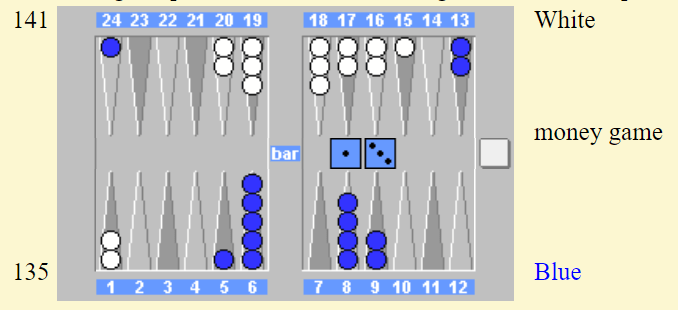
This position respresents some conflicts. Blue is locked in on the 24 point and White has made his bar point, so that is an incentive to move up. On the other hand, White has started to build his inner board and White has three checkers bearing down on his five point. That has to weigh the odds too greatly against 24/20, 6/5. Blue is better off hanging back, building his own board, and biding his time. This position presents a third alternative — 24/23, 9/5. Moving up to the 23 point is a plus. Blue can escape with sixes, but it is difficult for White to attack him there. The downside of this is that Blue is covering the five point with the wrong checker. Covering with the ace is much smoother for future board building. My guess is that the small advance of the back checker to where it can glimpse freedom has the higher priority, so I would play 24/23, 9/5.
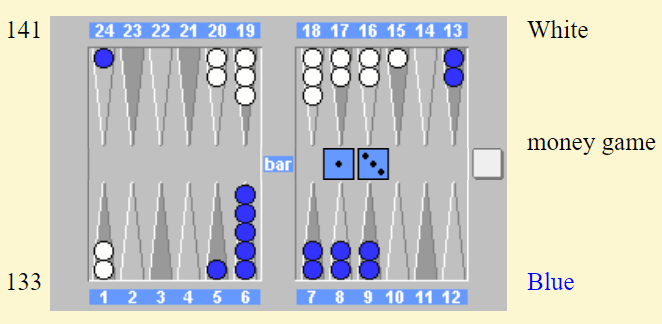
The above position may look similar, but Blue is more advanced. This makes a big difference. Blue needs to keep his offence in balance. 24/23, 9/5 leaves too big a stack on the six point. 9/5, 6/5 solves that problem, but Blue will be getting very cramped. Blue needs to keep his offense in good shape. The stripped midpoint limits Blue’s comfort zone, so keeping that spare on the nine point is vital. This time Blue should step up with 24/20, 6/5, even though he is likely to be attacked. He can live with that. What he can’t live with is falling over his own feet in the next couple of rolls.
For a change of pace, lets look at advancing the back man in positions which are more priming battles.
White is threatening to hem Blue’s back checker in. Should Blue advance to the edge of the prime in order to try to escape? No way! White would just attack, and Blue would be struggling to enter from the bar while White was extricating his own back checkers. Blue’s number one concern now is to build up his own prime — in particular his bar point. Blue’s timing is fine, since he has only one checker back to White’s two checkers back. Blue should sit quietly with 8/5, 6/5, let White do his thing, and hope to improve the offense next roll. Playing 24/21, 6/5 would be a big error.
This is an entirely different situation. Blue has completed his five-prime, and White is hemmed in nicely. The key now for Blue is to avoid getting hemmed in himself. It is vital to advance now. Blue doesn’t even care that much if White points on him. Blue doesn’t need to improve his offense any more. All he has to do is win the timing battle. It will be difficult for White to move both back checkers up and over Blue’s blockade while trying to walk the prime forward. However, if Blue plays 13/10, 6/5, White doesn’t have to do his attacking thing this very roll. He can split, slot, or do whatever his dice tell him to do. By advancing, Blue forces White’s hand.
That little opening on White’s nine point is a tempting target to shoot for. Blue should definitely play 24/22, 6/5. Being on the 22 point is ideal for Blue. Freedom is in sight, but it is difficult for White to attack on the three point. Even if White does successfully attack there, it isn’t the point White wants to make. The four point will still be open. Blue would like to build up his own offense, but sneaking up to the 22 point has priority. This is much better than playing 8/5. The key is that it forces White’s hand, and makes White do something he doesn’t particularly want to do — build his board out of order.
Same type of problem, but this time Blue’s advance would be to White’s four point. This is not nearly as good. It is no easier to escape from the 21 point than from the 22 point, since White owns the blocking ten point. White has four builders aimed at his four point, while only three builders are aimed at his three point. Most important, the four point is the next point in line for White’s prime. White would just love to attack there. Moving up with 24/21, 6/5 is a serious error. Blue should quietly hang back and play 8/5, 6/5.
These examples give an idea of some of the things one must examine when considering whether or not to make the European split. It is a critical play which may decide the course of the game, so it is important to get it right.
By Kit Woolsey