Basics for Beginners
Backgammon is a very easy game to learn; its very simplicity is, paradoxically, one of the main reasons for its relative lack of broad-based popularity over the years. Most people know it as “the game with all the points on the back of the checkerboard.”
The instructions on how to play accompanying these boards are equally simplistic — if you can understand them at all. Thus, if one is so inclined, or possibly merely inquisitive, the board may be set up and a game played out once or twice, with total boredom as the (predictable) result.
The standard reaction is, “Well, I’ve tried it, and it just didn’t turn me on.” Unfortunately, this is not only true but understandable. Nothing in the way the game is described in those four-page (at most) instruction sheets would turn anyone on, and if I read one of them today it might even turn me off.
This said, I must admit that the instructions here are equally simplistic, but, hopefully, more understandable. However, they are accompanied by an admonition — have faith, this is just the beginning. After you learn these few rules, we’ll get into the fun and excitement of the game.
To play, here’s what you need:
- Two players.
- A board.
- Thirty checkers or men; fifteen of them in one color and fifteen in another.
- Two dice.
Let’s discuss each element.
The Players
Backgammon is played by two players, although in a variation of the game called chouette (on which there is a separate chapter) more can participate. However, they act only as advisers and bettors; therefore the game in essence is a two-person affair. Throughout this book, you will be called White, and your opponent Black.
The Board
The game is played on a board; almost everyone has a vague idea of what the board looks like because it’s on the back of most checkerboards that can be bought in any ten-cent store. The same game can also be played on a board from one of the luxury leather goods houses, costing hundreds of dollars. Either way, it’s the same game; it’s merely the aesthetics that change. I have one comment about the board, however: be sure to play on at least a decent-sized one, for you will find a small board very uncomfortable and tiring. I find that the medium-size board (about 14 by 16 inches, opened) is as small as one should go; it also has the advantage of being the right size for the fold-down tables in airplanes.
This is what a board looks like:
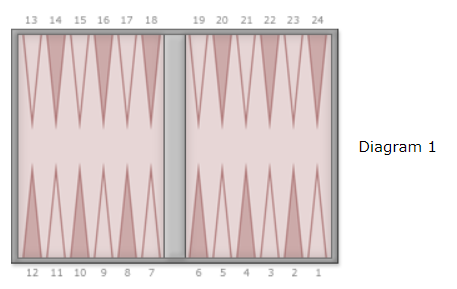
There are several things to note. There are twenty-four points on the board, twelve on each side. Although they are triangularly shaped and alternately colored, neither the shape nor the colors are of importance. Some manufacturers like black and white, others green and white. Louis Vuitton (surprisingly) doesn’t make boards in his own brown and yellow; he uses black and yellow. The points are used in counting the moves and can just as readily be straight lines; the alternating colors simply make it easier and faster to count. Some wooden boards from Greece and the Mid-east don’t have colored points; they are a bore to count on, and mistakes are more frequent.
The board is thought of as being divided into four quarters, which are sometimes called tables. However, in most places these sections themselves are also called boards, and I shall do so here. These four quarters are called your inner board, your outer board, your opponent’s inner board, and your opponent’s outer board.
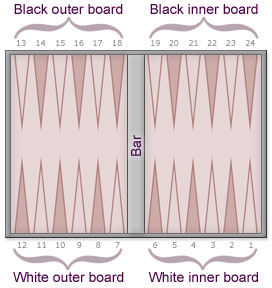
As you face your opponent, you can play with the inner board on your right or on your left. Which way is immaterial; one is merely the mirror image of the other. (This positioning of the board derives from the fact that in olden days the table was set up so that the inner board was always nearer to the source of light.) For the illustrations in this book, I shall use the inner board on the right, as in Diagram 2.
| ‘ | Ultimately, it will be necessary for you to play either way, since in every game one player has the inner board on his right and one player has it on his left. | ’ |
However, you can see that Black has to play with the inner board to his left; ultimately, therefore, it will be necessary for you to play either way, since in every game one player has the inner board on his right and one player has it on his left. (It would be a little ridiculous if you had to try to find only “left-handed” players!) Don’t fret about this, and learn it the one way for now; once you watch a few games and play yourself you will find that you are not even conscious of this difference.
There are six points on each of the two inner boards and each of the two outer boards; the inner boards are separated from the outer boards by what is called the “bar.” Starting on the inner board, the points are numbered 1 through 12 for you and the same for your opponent. These numbers and the designations of “inner” and “outer” are never printed on the board; you have to retain them in your mind. In describing moves, I will use as a notation system the designations B1, B2, B3, etc., for the points on Black’s side of the board and W1, W2, W3, etc., for the points on your side of the board. The 7 point is sometimes called the “bar point” and the inner board the “home board”; you should know these terms in case you play in a fancy club.
The Men
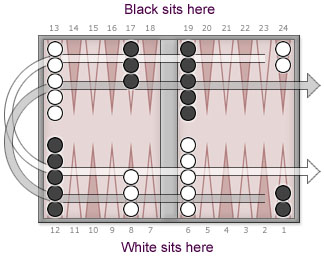
Each player has fifteen men; here too the colors are immaterial and are necessary only to distinguish your men from your opponent’s. To start the game, they are set up as shown in Diagram 3:
The Objective
To win, you must get all of your men off the board before your opponent does. To do this, you must move your men around the board in the direction shown in Diagram 3, from your opponent’s inner board, to his outer board, to your outer board, and then to your inner board before you can begin to take them off the board, as process called “bearing off.” Your opponent, of course, is trying to do the same, in the opposite direction.
To Begin
Usually the matter of choice of colors and direction of play is amicably resolved; if there is a question, you should avoid premature bloodshed by the toss of the dice. The game is begun by each player throwing a single die. The one who gets the higher number makes the opening move; the first move is determined by these two dice: his own die, and his opponent’s. Thereafter, the players alternate turns; each player throws both of his own dice and moves accordingly.
The Moves
The moves are always dictated by the throw of the dice. You must move any one man the number of points indicated by one die (starting to count from the point adjacent to the one you are moving from), and then either same man or another man (as you wish) the number of points indicated on the other die. Learn to count the move individually for each die: that is, don’t add them together, as this is amateurish and can sometimes mislead you. For example, a 6 and 5 on the dice can be played as a six move and a five move, or as a five move and a six move; it is not an eleven move.
In moving, you pass over and count every point, whether there are men on it or not. But you must be able to end each move on a point that is either open and has no men on it, or has your own men on it, or has only one of your opponent’s men on it. If the point has two or more of his men on it, then it is called “covered ,” “blocked ,” or “a closed door ,” and you are not allowed to land on it. However, you can pass over it when making your move, and you must count it while doing so. There is no limit to the number of men of one color that may be on a point.
If a point has only one man on it, that man is called a “blot,” and he is “hit” if he is landed on by the opponent. It is not necessary to hit a blot; that is, you are not required to land on a blot if you have another possible move. Being hit puts this man on the bar; any man on the bar has to start from the beginning, a process called “entering,” which we’ll come to after this illustration.
Assume Black won the opening by throwing a 4 while you throw a 3. Of the various moves he can make, let’s assume that he moves one man from the W1 to the W5 point (four points) and one man from the W12 to the B10 (three points). The board then looks like this:
It is your turn and you throw a 5-4. You can move one of your men on B1 to B5 (four points) and then the same man from B5 to B10 (five points) where you hit the Black blot and send it to the bar. Note that the move could not be made by counting the 5 die first, as this would have moved your man from B1 to B6, and he is not allowed to land on this point because Black has at least two men covering it. This is an important principle; there are many times when a move is prevented because several intervening points are covered, even though the point you would like to land on by totaling your dice is open.
Let’s assume in this same diagram that you throw a 5-2. You have these alternatives:
- You can move one man from B1 to the B3 point, but that’s all; you cannot make the five point move from there because the B8 point is covered. Nor can you move from B1 to B6 for the five points, because B6 is also covered by your opponent.
- You can move one man from B12 to W11 for the two-point move.
- You can move one man from B12 to W8 for the five point move.
- You can move one man from B12 to W8 and then the same man to W6, for the full move of five points and then two points. (This move can also be made by going from B12 to W11 and then to W6).
- You can move one man from W8 to W6 for the two-point move.
- You can move one man from W8 to W3 and then the same man to W1, for the full move of five points and two points. This, of course, also hits the Black blot on W1 and puts him on the bar.
- You can move one man from W6 to W4, for the two-point move.
- You can move one man from W6 to W1, for the five-point move, here too hitting the Black blot on W1.
You should understand that these alternatives can be used any way you wish, as long as you make an allowable move for each die. For example, you might decide to play this throw by moving one man from B12 to W11 and one man from W6 to W1. Or you might decide to move one man from B12 to W11 and one man from B12 to W8. The way you choose among these possibilities and play your men has to do with the strategy of the game, which is what the rest of this book is about.
If you throw a double — that is, if both dice show the same number — then you must move that number of points four times. You can do this with any of five possible combinations of men, provided only that the points are not covered by your opponent. For example, if you throw a double 3, you can move:
- any one man four consecutive moves of three points each;
- any two men, each for two consecutive moves of three points per move;
- any one man three points, and any other man three consecutive moves of three points each;
- any two men three points each, and any other man two consecutive moves of three points each;
- any four men three points each.
There are two rules concerning moves you should be aware of: the first is that you cannot refuse to make your move if one is possible. The second is that if it is possible for you to make one move or the other, but not both, then you must make the move shown by the higher of the two dice.
Entering a Man from the Bar
When you have a man (or men) on the bar, you cannot make any other move until he (or they) gets back on the board. To do so, you must throw a number on either die that corresponds to a point in your opponent’s inner board that is not covered by him. You can come in on this point, and then you must move that man or any other man the number of points shown on the other die. If he should have a blot on the point you come in on, you may hit it as well.
Let’s assume the situation in Diagram 5:
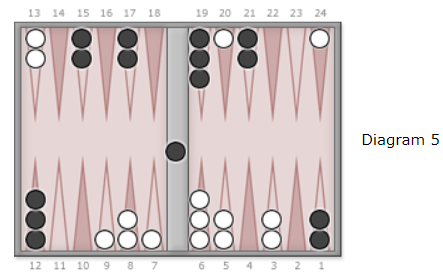
Here Black has been hit and is on the bar. He can enter if he throws a 1 (on his own point) or a 2 or 4; he cannot come in if he throws a 3-5, 3-6, 5-6, 3-3, 5-5, or 6-6. And until he comes in, he is not allowed to make any other move; in effect, he has lost his turn.
Let’s assume that he throws a 5-2. He cannot come in on the W5 point because it is covered by you, but he can come in on the W2 point. He then can hit your blot on the W7 point with his W2 man for his 5 move. He can also let this man remain on the W2 and instead hit your blot on the B5 point from his B10 point, hoping to both delay you and possibly get your other blots on a later throw.
If you have two or more men on the bar, you must get them all in before you can make any other move. It may be that you can enter only one man on that first throw and will have to wait for your next turn to try to get the second man in. If your opponent has covered several points in his inner board, having a man on the bar can materially — perhaps vitally — slow you down.
Making Points
You can see that when you have hit your opponent’s blot, he can lose a turn or more if he cannot easily enter your inner board. Therefore the more points you have covered in it, the harder it becomes for him to come in; consequently, there is a certain value in covering these points. However, there are other aspects to the strategy of the game; in other chapters I will get into the question of battle tactics such as why covering inner board points too early is not wise.
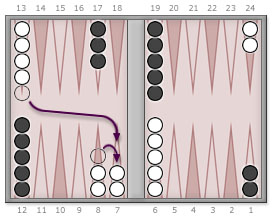
For the moment, you should become familiar with making points and learning how to count quickly to do this. Certain throws are obvious, and you will get to know them quickly. For example, if you have a 6-1 throw, an obvious move is to make the W7 point by moving one man from B12 and one man from W8, as illustrated in Diagram 6.
Or, if you throw a 3-1, the move is to make the W5 point by moving one man from W8 to W5 and one man from W6 to W5.
In each case, you used what are called “builders” — that is, men who are not necessary to cover a point, and so can be moved to another point to build it. Builders can also mean blots, since blots can be built on or moved, depending on the throw of the dice.
If you manage to cover all six points in your inner board by having two or more men on each of these points, you have what is known as a “prime.” Should your opponent have a man on the bar, then he need not even pick up the dice, since he can throw only a 1 through 6 and all of these points are closed against him. He has to sit and wait until you open up one of these points before he can even try to come in. If you have covered any other six consecutive points — for example, the 4, 5, 6, 7, 8, and 9 points — it is called a “side prime,” and should your opponent have a man on your 1, 2, or 3 points, he is locked in there until you open up one of your covered points, since he cannot throw anything larger than a 6 and so cannot move this man.
Bearing Off
Once you have brought all your men around the board and into your inner board, you are ready to bear off: this is to remove your men from the board. Once borne off, the man is then out of the game, and the first player to get all his men off the board wins.
You cannot bear off unless and until all your men are in your inner board. Therefore, if you should leave a blot that your opponent hits, this man must re-enter the board and get back into your inner board before you are allowed to bear off any more men, even if you have already taken some of your men off. This tactic of your opponent’s keeping some of his men in your inner board in an attempt to hit you at this latter stage of the game, is called a “back game,” and is one of the strategies discussed in detail in the chapters dealing with tactics.
You bear off according to the dice. For each die thrown, you may remove a man from the point which corresponds to the number thrown, or you may instead move a man within the board the proper number of points.
For example, if you throw a 6-3, you may remove one man from your 6 point and one man from your 3 point. But suppose your opponent still has two men on your 1 point, waiting hopefully to get a shot at a blot you have to leave, and you only have two men on the 6 point:
As you can see, if you get hit now you will have a hard time getting back in, with all the points Black has covered in his inner board. And since you cannot continue to bear off until your man gets all the way around and back into your inner board, you could easily lose. Obviously you do not want to bear off men from the W6 point and the W3 point as this will give Black a shot at the blot on W6.
However, you do have an alternative. While you must make every move if you can, you are nonetheless allowed to move within the board if you wish (provided that it is permissible for you to land on that point). Therefore you can take one man off the W6 point and for your three move bring the other man on W6 to the W3 point, so that he is still safe. You have only taken one man off, instead of two, but this is a far wiser move.
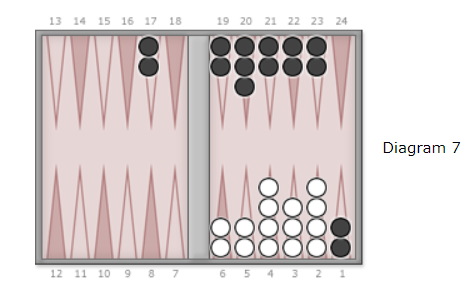
Now assume for Diagram 7 that you throw a 6-5 (instead of the 6-3 we’ve just discussed). You must take one man off the W6 for the 6 die, but now you cannot move the blot on the W6 point for the five move because the W1 point is covered by Black. You have no choice: you must take a man off the W5 point as well, and now Black has a shot at the two blots on W5 and W6.
Here’s another way you can get into trouble: if you do not have a man on the point which corresponds to the number thrown, but do have a man on a higher point, then this man must be moved the proper number of points. Also, if you do not have a man on the point that corresponds to the number thrown, nor do you have one on a higher numbered point, then you must bear off a man from the highest point on which you have men. Let’s assume in Diagram 8 that you throw a 6-3.
Since you do not have a man on the 6 point, you must take a man off W5 for the 6 throw. The blot you now leave on W5 cannot move the 3, so you must move a man from the W4 to the W1, leaving another vulnerable blot on W4.
Note too that you cannot take a man off the W1 point for the three move, because you still have men on higher points. It is only when you have no men on the point corresponding to the die thrown, or on any higher-numbered points, that you may remove a man from a lower-numbered point you still hold.
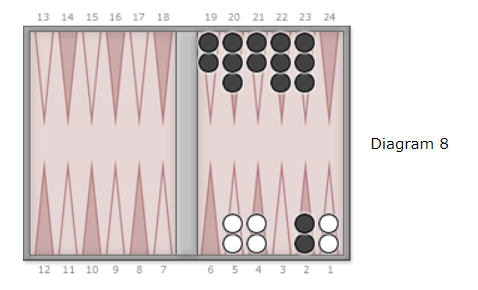
This is where a rule I mentioned earlier becomes important. Remember, if you can make one or the other of your moves, but you cannot make both, then the higher one must be made. Let’s assume in Diagram 9 that you roll 3-1.
Looking at the board, you will see that you cannot make both of your moves. Obviously, if you had a choice, you would make the 1 move bringing the man from W5 to cover the W4 blot. However, since the rule is that you must make the higher-numbered move, you have to move from the W5 to the W2, thereby still leaving two blots for Black to get a shot at.
Doubles, of course, are played normally even in bearing off: they allow (or require) four moves.
Gammons and Backgammons
If you succeed in bearing off all of your men before your opponent does, then you have won the game. However, if you do so before he has taken any of his men off then you have won a gammon — a double game. Should you be playing for stakes, you have won double the bet. If you should bear off all your men before your opponent has taken any of his men off and he still has one or more of his men in your inner board or on the bar, then you have won a backgammon — or triple game. And triple the bet.
The Doubling Cube
Now for the fun, and what this book is all about: betting! Some fifty years or so ago some genius who wanted more action than he was getting with the double and triple game invented the doubling cube. This looks like a refugee from a mah-jongg set, and has on it the numbers, 2, 4, 8, 16, 32, and 64. This is a big gun, and should be treated as such; its principle is to multiply the basic bet and its aim is to annihilate your opponent.
When the game begins you will usually see the doubling cube on the center of the bar, and it is generally turned to 64. This indicates that it really means zero and is up for grabs. (It can be placed off to the side, and left at any number, but the clearest way to use it is as I’ve indicated. Then there can be no question.)
Now, the opening and basic bet is for whatever may have been agreed upon at the outset; let’s say a dollar a game. At some point during the play one of the players, thinking he has a sufficient advantage, will turn the cube to the number 2 and place it before his opponent. This is a challenge to double the bet. (Incidentally, the cube can be turned by a player only before it is his turn to throw the dice.) The opponent then has the option of accepting the cube and continuing the game, but now for a bet of two dollars, or he can refuse the cube and give up the game, thereby losing the initial dollar bet.
If he accepts the double, he keeps the cube on his side of the bar, or he can put it on the table next to his inner board, with the number 2 remaining up. Now, however, the cube is in his control, and only he can throw it the next notch to 4. This may happen if and when the tide of battle turns; a combination of circumstances now places him in what appears to be a strongly advantageous position, and so he turns the cube to 4. The first player now has the option of quitting and paying his opponent two dollars, or accepting and playing for four. If he accepts, the cube of course is now in his control. And so it goes, theoretically as high as the two players wish to take it. In practice, however, it is rare to see it go above 16 or, sometimes, 32.
Finally, the outcome of the game — that is, whether it is a single, double (gammon), or triple (backgammon) game — acts as a multiple of the cube, so that if the cube is at 16, for example, and the game ends as a gammon or double game, the winner has made 32 dollars. Not an uninteresting increase from the initial dollar bet, especially considering that the game has probably taken less than ten minutes to complete! Remember, it is the breakneck speed of the game, once you have learned to play, that gives it so much of its excitement.
A word of caution: please don’t play for money until you have read more of this book, and especially the chapter on betting. It will not only save you some money, but may also help you make some.
Automatic Doubles
If, in the throw for the first move, doubles are thrown, then each player has to throw his die again. A betting refinement accepted by many player is that this automatically moves the doubling cube up one notch. Of course, it still remains in the center of the table, available to either party; the double has simply doubled the bet.
Also, some players allow the player who gets the higher die on this throw for first turn the option of refusing this combination of dice, if it is not a good one, and throwing both dice over to determine his first move. In some places the doubling cube is also turned up one notch in this case. Both of these points should be discussed and settled before the game begins.
Throwing the Dice
There are certain basics to be aware of in throwing the dice.
The rules provide that each player throws the dice onto the board on his right, and that if a die jumps the bar, goes off the board, comes to rest on a checker (even if it lands flat) or is tilted in any way, both dice have to be re-thrown.
Although only one pair of dice is necessary to play, it is preferable to use two sets. One reason is that the rules allow a player to change his move, even several times, if he wishes to; picking up his dice is the signal that he has completed his move. When playing with only one pair of dice, the player usually signals the completion of his move by picking them up and handing them to his opponent. Unfortunately, it sometimes happens that the opposing player, in his eagerness, picks up the dice himself before the moves are completed, and in such circumstances I have seen violent arguments ensue as to what the dice said. Having two sets of dice eliminates this problem, since each player touches only his own dice, not his opponent’s. When using two sets of dice, if the opposing player should throw his dice before the player making the move picks up his own, he must throw over.
Very often you will also see the dice being thrown from a cup (with two pairs of dice, two cups). The advantage to using a cup is that when the dice are shaken and then thrown from a cup, there can be little if any question about the legitimacy of the roll; when dice are thrown from the hand suspicions may — and sometimes do — arise. I, for one, will never play in a strange place without using a cup.
You will often see players physically counting their move on the board. This is a bad habit, and if it is in your repertoire it should be eliminated as soon as possible, simply because it is a dead giveaway that you are a beginner. Psychological warfare is part and parcel of backgammon, and will be discussed in the chapter devoted to strategy. Therefore, as soon as possible learn to count mentally; then, having thought out their ramification in you mind, make your moves with confidence and assurance.
Also: always count the other player’s move. Don’t assume it is correct. Don’t fall into the bad habit of fearing to appear dull by counting the long move. Count mentally if you wish, but check all moves. I won’t say that I’ve seen players cheat, but I have seen games lost because a player made the mistake of not catching a mistake. So don’t be shy; count.
Incorrect Moves
What about incorrect moves? First, they must be corrected before the subsequent throw of the opposing player. Once this throw has been made, all moves — correct or incorrect — are final.
This is one game where even the pretences of “sportsmanship” are eliminated. Outright hostility prevails, and in my opinion the world is better for its being expressed over the gaming board rather than elsewhere.Nor is there an obligation to correct an erroneous move; if your opponent makes a wrong move that is to your advantage, shut up! Not only are you not expected to correct him, but you are considered stupid if you do.
Of course, if the erroneous move is not in your favor, point it out. Firmly. I like to add a slight leer when I do; the implication that my opponent may not be quite as smart (or as honest) as I am can sometimes rattle him.
Kibitzers
The only person who can or should call attention to a mistaken move is the opposing player — not a spectator! It is up to the player himself to keep his opponent honest; third parties, like neutral nations, should not intrude. Unless you are playing a chouette, backgammon is a head-to-head conflict, and anyone watching the game must remain uninvolved. No comments. No corrections. No grunts of surprise or approval at a play. Nothing. Just watching.
If a spectator should violate your privacy of play, you have every reason to ask him to respect your rights. He must either remain quiet if he wants to stay and watch, or get a board and partner of his own and play elsewhere. Your manner in firmly dealing with a kibitzer will not only create the proper climate for your game but may also help psych out your opponent by demonstrating your self-assurance and strength of will.
Learn these few rules, then do several things. Read the rest of this book, at least for a general overview. You probably won’t get it all at first, but don’t panic. There’s a lot to assimilate. Try to get someone good to play a few games with you, or go to a pub where backgammon is played; buy a drink and stand around and watch. If you’re lucky (I do believe in luck) someone will look sympathetic enough for you to question: take advantage of this. You’ll quickly begin to understand the complexities — and the fun. The excitement will follow.
Finally, get up the courage to play, which is the only way to become a good player. Don’t worry about making a fool of yourself; the best players often make mistakes, and even more frequently are accused of them.
Then, the supreme test: play for money. Not necessarily much, but enough so that it matters, enough to make you play carefully. I have friends who play for a nickel a point; they’ll never really be good because they can afford more. But if they played for a cigarette a point (they are both chain smokers and are constantly running out) they would do much better. You don’t make the same mistake a second time when it’s costing you. So: play for just a little more than you are willing to lose. But play!Very important: as you begin to understand, enjoy, and inquire, go back to specific sections and chapters in this book often. As you get into the game, a lot of the material will take on more meaning and help you to become a good player. Get your money’s worth from it.
Leave a Reply